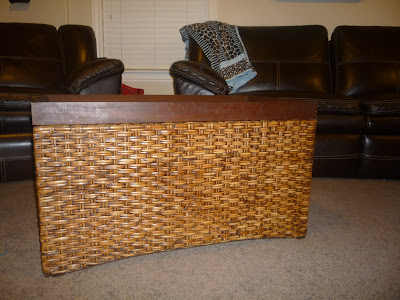
My husband got me this chest a few years ago for blankets and what not, but slowly it just turned into a toy box... that's what happens after you have kids I guess :) ! Anyway, it was in major need of an update, and after considering just getting a new one I decided to be cheap and make due for now. So this is what happened...
 I know what you're thinking, the top TOTALLY needs paint, but I haven't decided on that one yet. My 3 year old likes to color on this and, let's be honest, isn't the best colorer (not a word, I know!) so it gets a lot of marker, paint, crayon, you name it marks. Sooo, until I decide what to do with the rest of it, or what to do with her, it will stay half ugly... and I'm ok with that.
So how did I do it? ...
1- Measure out your fabric to make sure it will fit!
2- Remove the top and handles
3- If your fabric will go all the way around, fantastic, but I just used some I had already in 2 pieces... so I folded the edges around the back and hot glued them (just to make a seam, without having to sew) and it ended up looking like this:
 Look closely in the center of the picture and you can see the seam down the middle. If your fabric fits all the way around then just have your seam in the back of your chest or basket or whatever it is that you're covering.
4- Pull your fabric over the edges of the top and staple, making sure your fabric stays even and leaving enough room to staple it to the bottom also.
5- Staple the entire top, gathering the fabric a little on the edges, then once that's tight turn over your piece and staple the bottom, pulling the fabric so it's tight again.
6- Once you're finished stapling you can go back on your seam (where the 2 sides come together) and hot glue it shut if you need to. You might not have to, though, if you've stapled your fabric tight enough.
And wah lah! You're done! So easy!
Stuff Ya Need:
Fabric
Staple gun
Glue gun
Screw Driver (to remove the top or any handles)
1- Measure out your fabric to make sure it will fit!
2- Remove the top and handles
3- If your fabric will go all the way around, fantastic, but I just used some I had already in 2 pieces... so I folded the edges around the back and hot glued them (just to make a seam, without having to sew) and it ended up looking like this:
 Look closely in the center of the picture and you can see the seam down the middle. If your fabric fits all the way around then just have your seam in the back of your chest or basket or whatever it is that you're covering.
4- Pull your fabric over the edges of the top and staple, making sure your fabric stays even and leaving enough room to staple it to the bottom also.
5- Staple the entire top, gathering the fabric a little on the edges, then once that's tight turn over your piece and staple the bottom, pulling the fabric so it's tight again.
6- Once you're finished stapling you can go back on your seam (where the 2 sides come together) and hot glue it shut if you need to. You might not have to, though, if you've stapled your fabric tight enough.
And wah lah! You're done! So easy!
Stuff Ya Need:
Fabric
Staple gun
Glue gun
Screw Driver (to remove the top or any handles)
*I now feel like my toy box is bearable, although my daughter did not notice at all. Should I be offended? :)


2 comments:
Just make the top a white board and Taya could have all kinds of fun with it :)
It's such a cute piece and its really perfet for hiding toys, blankets, magazines and junk. It looks great. So much better than the brown.
Post a Comment