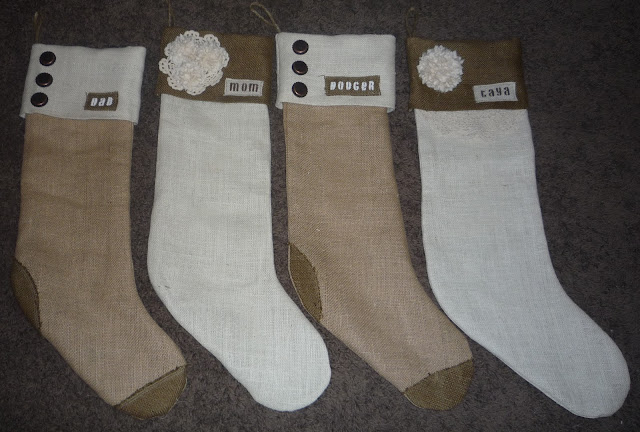
I saw a picture on a blog a while back that showed burlap stockings and they were SO SO cute!! I've never bought our family "official" stockings because, let's be honest, they're usually pretty pricey if you want cute ones (unless you find ridiculous deals at Pottery Barn, like my mother in law did last year... I'm still so jealous!).
Anyway, burlap is awesomely cheap so I decided to make them myself... finally! I'm pretty excited about how they turned out, nothing fancy or frilly, just simple and cute...
Let me just apologize before hand about lack of how-to pictures, my camera (which is only a year old) broke over Thanksgiving- not that I was ever a professional photographer anyway, we all know that!
How-To
1. I used a decorative wall stocking that I have to make a pattern, but you can just draw one out. I did mine a little larger, so I just traced it about an inch bigger. I placed the stocking on wax paper, drew around it, and cut out.
2. Pin your wax paper stencil to your fabric and cut out...
(Don't mind the writing, I was just playing!)
3. If you want to add any pieces to the outside of the stocking (like I did on the toe and heel) do it now before you sew the front and back pieces together. I didn't use any pattern for this, just cut as I went. Remember it's burlap so it doesn't have to be perfect! Pin your heal/toe pieces to the stocking front and sew.
4. Sew the front and back pieces of your stocking together.
*Don't turn the stocking inside-out yet.
5. For the top of the stocking fold your burlap piece in half. Iron it to make it easier. When you buy burlap it comes folded in half, so I used as much as I had of that. (I haven't gotten much sleep lately so as of right now I can't think of how to say that better! Ha, sorry!)
6. Cut your top piece to fit your stocking. (Use your measuring tape to see how long you need it.) Mine ended up being about 7" wide x20" long.
7. Fold the piece in half and sew on the very edge (about 1/4").
Your piece should look like this:
8. Place the sleeve inside your stocking - Like this picture, except put the piece inside the stocking - and sew on the top edge only.
9. Turn your right side out.
10. Sew on something to be able to hang your stockings by. I used this rope/hemp looking stuff from Hobby Lobby...
Sew it in the, let me think how to put this... Upper corner of the left side on the inside of the stocking. Wow that makes no sense, but I think you know what I'm talking about, yes? :) It's a little bit tricky, but I thought this was easier to do it this way then having to add it before the top of the stocking. You just have to maneuver your stocking around your sewing machine.
11. Add decorative pieces. I wanted the boys stockings to be simple and I couldn't find any buttons I liked so I went with these...
Yes, bottle caps :). You can use real caps, but they actually sell these at Hobby Lobby in the scrapbooking section.
For the ladies stockings I went with a prettier look. I followed a SUPER cute idea HERE from Under the Table and Dreaming to make the flower thingys for mine and Taya's stockings...
I attached the flower thingy's (just get used to me saying "thingy's because it's going to happen a lot!) by gluing a piece of cardboard to the bottom of the foam, then I hot glued them onto the burlap. The cardboard was just to protect the foam so it wouldn't melt at all. Then I added some doily's for extra pizazz... do people still use that word? Make sure you put something in between where you're hot-gluing so you don't accidentally glue your stocking together.
12. Add your letters. I used my Cricut machine to cut the stencils, then taped them together and taped her name to the burlap. The tape is nice just in case you get any paint around the edges! Wait until it dries a little to peel off the stencil, but don't wait too long or the paper will stick and might rip up some of your paint. You can also just buy stencils if you want!
13. Pin your name to the stocking and sew around it. Again, it's a little difficult to maneuver your stocking around the machine, but I waited until the end to do this because I wanted to be able to see the exact placement.
Done!
Here's some close ups:
And on our fireplace...
Hope you like them!


4 comments:
Really cute. Fun. Terry
Ashley - These are adorable! Fantastic job! Thanks so much for linking to the party - I greatly appreciate it! I featured these today - stop by and grab a featured button if you like. Hope you have a lovely week! ~ Stephanie Lynn
I adore your stockings! You did a fabulous job! FOund your blog on Under the Table and Dreaming.
Happy Holidays!
Michelle
I love them!!! What a great idea.
Post a Comment